Battery switch on travel trailer function is crucial for managing your RV’s power. Understanding how to use your battery switch correctly is key to preventing dead batteries, protecting your electrical system, and ensuring a smooth camping experience. This guide covers different switch types, connection procedures, troubleshooting tips, and safety precautions, empowering you to become a confident RV owner.
We’ll explore everything from the basics of how a battery switch works to advanced techniques for managing your power sources, including shore power, house batteries, and chassis batteries. We’ll also look at the impact of adding solar panels or generators to your setup and how to maintain your battery system for optimal performance and longevity. Get ready to master your travel trailer’s electrical system!
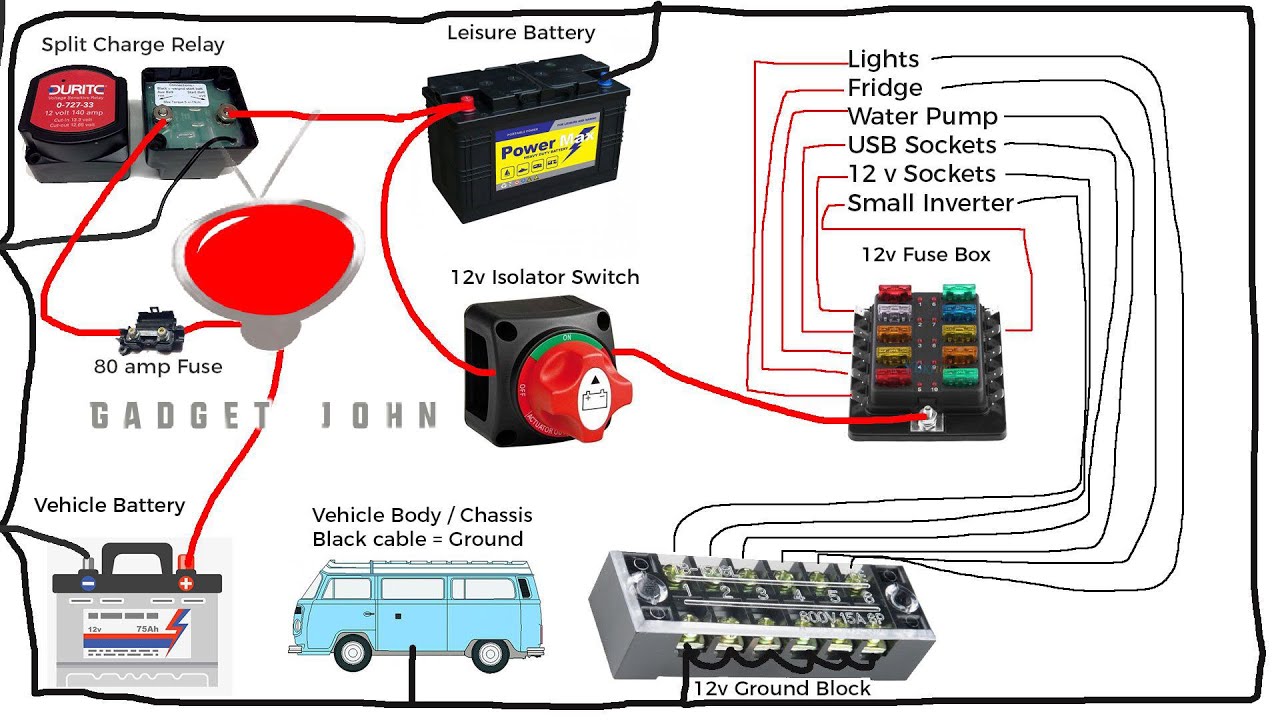
Connecting and Disconnecting Batteries: Battery Switch On Travel Trailer Function
Properly connecting and disconnecting your travel trailer’s batteries is crucial for safe and reliable operation. Understanding how your battery system interacts with shore power and how to maintain your connections will extend the life of your batteries and prevent electrical issues.Connecting to shore power essentially bypasses your house batteries for most appliances. While connected, your RV’s 120V systems (lights, refrigerator, microwave, etc.) will run directly from the shore power.
However, the 12V systems (interior lights, water pump, some fans) will still draw power from your house batteries unless specifically designed to switch over to shore power. This means your batteries will still discharge slowly even while plugged in, especially if you have devices running on 12V.
Connecting to Shore Power and its Effect on Battery Usage
When you connect your travel trailer to shore power, the 120V AC power from the campsite or RV park takes over the power needs of most appliances. This reduces the load on your 12V DC battery system. However, some appliances and systems, like the water pump and interior lights, continue to draw power from the house batteries. Therefore, while connected to shore power, your batteries will still discharge gradually, especially if you leave lights on or run 12V appliances for extended periods.
So, you’re planning a trip? Awesome! First things first: get travel insurance. Seriously, check out Aon travel insurance – they’ve got solid coverage. Once you’ve sorted that, think about your in-flight entertainment. If you’re an audiophile, you’ll want a killer setup.
Head over to this audiophile travel setup guide for some top tips on getting amazing sound on the go. It’ll make those long flights a breeze!
To minimize battery drain, it’s best practice to turn off unnecessary 12V appliances and systems when plugged into shore power.
Disconnecting the House Battery from the Chassis Battery
Disconnecting the house battery from the chassis battery is important for preventing unwanted drain on the house batteries and to avoid potential issues when working on the electrical system. The exact procedure depends on your RV’s wiring setup, but it usually involves locating the disconnect switches or terminals for each battery bank. These switches are often clearly labeled. Turning off the switch for the house battery will isolate it from the chassis battery and other systems.
Remember to consult your RV’s wiring diagram for the precise location and procedure.
Maintaining Battery Connections to Prevent Corrosion
Corrosion on battery terminals is a common problem that can lead to poor connections, reduced battery life, and even electrical fires. To prevent this, regularly inspect your battery terminals for corrosion (white or green buildup). Clean the terminals using a wire brush or terminal cleaner and apply a corrosion inhibitor or dielectric grease to protect them from moisture. This should be done at least twice a year, or more often in humid environments.
So, you’re planning a trip? Awesome! First things first: get travel insurance. Check out this page on Aon travel insurance to compare options and find the best fit for your adventure. Then, if you’re an audiophile like me, you’ll want to check out how to set up your audiophile travel setup before you go.
Nothing ruins a trip like bad sound! Seriously, prioritize both – insurance protects you, great sound elevates your experience.
Tighten the terminal connections to ensure a good electrical contact. Keeping the battery box clean and dry will also significantly help reduce corrosion.
Battery Source Switching Flowchart
The following describes a typical flowchart, but your specific RV may vary. Always consult your owner’s manual.[Diagram Description: The flowchart would start with a box labeled “Shore Power Connected?”. A “Yes” branch would lead to a box labeled “House Batteries Charging (slowly discharging if 12V devices are on)”. A “No” branch would lead to a box labeled “House Battery Switch ON?”.
A “Yes” branch would lead to a box labeled “House Batteries Powering 12V Systems”. A “No” branch would lead to a box labeled “House Batteries OFF”. All end points should be clearly marked.]
Battery Switch and its Role in Electrical System Management

The battery switch is a crucial component in your travel trailer’s electrical system, acting as a central on/off control for your house batteries. It’s more than just a simple switch; it plays a vital role in protecting your investment and ensuring the longevity of your electrical components.The battery switch’s primary function is to isolate your house batteries from the rest of the electrical system when not in use.
This prevents parasitic drain, a slow but steady depletion of battery power caused by small electrical draws from devices like clocks and smoke detectors, even when your trailer is not connected to shore power. This protection is essential for maintaining a full charge and preventing premature battery failure.
Battery Switch Functionality Compared to Other Battery Management Systems
A simple battery switch offers basic on/off control. More advanced battery management systems (BMS) offer a wider range of features, including monitoring battery voltage and state of charge, managing charging from various sources (shore power, solar panels, alternator), and even preventing overcharging or deep discharging. While a simple switch is sufficient for some, a BMS provides more sophisticated protection and optimization of your battery system.
A BMS might also include features like automatic switching based on battery voltage, preventing the battery from being completely drained. A simple battery switch provides a basic level of control, while a BMS offers significantly more advanced functionalities.
Impact of a Faulty Battery Switch on Battery Lifespan, Battery switch on travel trailer function
A malfunctioning battery switch can severely impact your battery lifespan. If the switch fails in the “on” position, it will lead to constant parasitic drain, quickly depleting your batteries and shortening their lifespan. Conversely, if the switch fails in the “off” position, you won’t be able to use your house batteries at all, rendering your appliances useless. In either scenario, the consequences range from inconvenience to significant repair costs and the need for premature battery replacement.
For example, a constantly “on” switch could drain a typical deep-cycle battery in a matter of weeks, necessitating a replacement far earlier than its expected lifespan of several years.
Travel Trailer Electrical System Diagram
Imagine a simple diagram: A circle represents your house batteries. A line extends from the positive (+) terminal of the batteries. This line leads to a square, representing the battery switch. The switch has two positions: ON and OFF. When the switch is in the ON position, the line continues from the switch to another circle, representing the main distribution panel of your trailer.
From this panel, multiple lines branch out to power various appliances (lights, refrigerator, etc.). A separate line connects the negative (-) terminal of the batteries directly to the main distribution panel, completing the circuit. When the switch is OFF, the line from the batteries is interrupted, effectively disconnecting the batteries from the rest of the system. This visual representation clearly shows how the battery switch controls the flow of power from the batteries to the rest of the trailer’s electrical system.
Mastering your travel trailer’s battery switch is more than just flipping a switch; it’s about understanding your RV’s electrical system and ensuring reliable power for your adventures. By following the safety guidelines and maintenance tips Artikeld in this guide, you can confidently manage your batteries, prevent issues, and extend the life of your electrical components. So, go forth and enjoy the power – literally!
Frequently Asked Questions
What happens if I leave my battery switch in the “both” position?
Leaving the switch in the “both” position constantly can drain your batteries faster, especially if you’re not connected to shore power. It’s best to switch to “off” when not using the trailer for extended periods.
How often should I check my battery connections for corrosion?
Check your battery connections at least every three months, or more frequently if you notice any signs of corrosion.
Can I use a different type of battery switch than what came with my trailer?
You might be able to, but it’s best to consult a qualified RV technician to ensure compatibility and safety. Improper installation can lead to electrical problems.
My battery switch is making clicking noises. What’s wrong?
Clicking noises often indicate a faulty switch or loose connections. Check for loose wires and inspect the switch itself for damage. If the problem persists, consult a professional.
